The short answer
A control panel build needs ten categories of product: enclosure, DIN rail, power supply and distribution, control devices, terminal blocks, internal wiring, cable management, door and field connections, marking, and tools. The planning rule that prevents most mistakes: design from the inside out, build from the outside in. The component list sets the rail layout, the rail layout sets the enclosure size — so the enclosure is the first thing you install and the last thing you should specify.
- Lay out the DIN rail on paper first: total device width plus at least 20% for end brackets and spacing
- Allow a minimum of 30% spare internal space for wiring, heat and future expansion
- Size the PSU with 20–30% headroom — everything in a sealed box shares the same air
- Ferrule every stranded conductor before it meets a screw or cage clamp terminal
- Marking to IEC 60204-1 is a compliance requirement, not a finishing touch — order markers and a label printer with the parts
A control panel build touches more product categories than most buyers plan for, and the categories that get forgotten — end brackets, ferrules, cable markers — are the ones that stop a build dead while a second order ships. This guide is written for panel wiring engineers, OEM machine builders and automation integrators, and works through every category in build order with links to Rapid's stocked range. It doesn't specify MPNs — those come from your design — but if every section below is covered or consciously ruled out, the build won't stall.
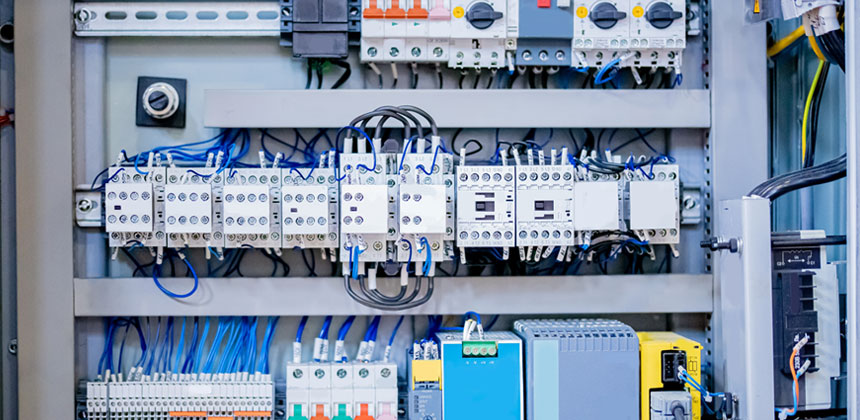
How should you plan a control panel build?
Backwards, relative to how it's assembled. The build starts with the enclosure on the wall and works inwards, but the design has to run the other way: the application determines the control devices, the devices determine the rail layout and the terminal count, the layout determines the trunking runs, and only then does the enclosure size fall out — with spare capacity added on top. Specify the enclosure first and you're gambling that everything else will fit, and the losing version of that gamble is discovered at the worst possible time.
The other quantity to design rather than discover is heat. A sealed panel is a box of shared air: the PSU, contactors, drives and relays all dissipate into it, and every component's rating assumes an ambient temperature that the box itself determines. This is why the PSU headroom rule and the 30% spare-space rule aren't generosity — they're thermal margin. For hot climates, dense panels or anything with drives in it, budget for ventilation or heat management from the start rather than retrofitting it after the first thermal trip.
What do you need? The build, stage by stage
1. Enclosure
Once the rail layout from stage two exists, the enclosure decision is mostly made for you: internal dimensions to fit the layout plus margin, IP rating to suit the environment (IP54 for benign indoor use, IP65/IP66 for dusty or washdown conditions), and material — steel from the wall mount or heavy duty ranges for mechanical robustness and EMC, or GRP where corrosion rules steel out. Enclosure accessories cover mounting plates, hinges and locks. Door cut-outs for switches, displays and glands are best not done with a jigsaw on site: Rapid's enclosure modification service delivers panels pre-machined to specification, with the IP rating intact. For the fuller decision, see our guide to choosing the right enclosure.
2. DIN rail and mounting
Standard 35mm top-hat (TS35) rail is the backbone everything else clips onto. Total up the width of every rail-mounted device from the design, add at least 20% for end brackets and spacing, and order from DIN rails and accessories — rail cuts to length on site, so err long. This paper layout is also the moment the enclosure size becomes a fact rather than a guess.
3. Power supply and distribution
Most panels need a rail-mounted PSU converting mains AC to 24V DC for the control circuit — size it from the DIN rail power supplies range with 20–30% headroom over calculated load, remembering that the derating curve in the datasheet is read against the temperature inside your box, not the room. Mains enters through an IEC inlet; the PSU output splits to circuit feeds through distribution blocks, and fused terminal blocks give each circuit its own protection without a separate fuseholder row.
4. Control devices and automation components
The active heart of the panel is application-specific, but the usual cast includes PLCs and HMIs, relays in plug-in, solid-state and signal varieties, motor control — contactors, overloads and inverters — plus timers and interface modules. This is the list to finalise first, because everything upstream of it in this guide is sized from it.
5. Terminal blocks
DIN rail terminal blocks are the organised, serviceable boundary between panel wiring and field wiring. Count the terminals from the wiring diagram, then add spares — a panel with no spare ways is a panel that gets untidy at its first modification. Screwless push-in types repay their premium in wiring time on volume builds; pluggable terminal blocks simplify field disconnection at commissioning and service. Order the accessories — end brackets, jumper bars, covers and markers — with the blocks, from the same manufacturer, since they rarely interchange. Our terminal blocks guide covers the screw-versus-screwless decision properly.
6. Internal wiring
Panel wiring runs on multi-strand hook-up wire, typically 0.5–1.0mm², colour-coded to IEC 60446 so the panel can be inspected and fault-found without a diagram in hand. Measure expected runs and order generously — wire is cheap and running out mid-build isn't. Every stranded conductor entering a screw or cage clamp terminal gets a bootlace ferrule; the rest of the termination hardware lives under crimps, splices and terminals.
7. Cable management
Slotted wiring duct from conduit and trunking routes cables between rail rows and to the door, and it shares the mounting plate with the rail — plan the two layouts together, not in sequence. Cable ties bundle free-hanging runs such as door looms, grommets protect anything passing through bare sheet metal, and cable clips and sleeving handle routing and protection outside the trunking.
8. Panel door and field connections
The operator's side of the panel — push buttons, selector switches, panel indicators and emergency stops — mounts through the door and wires back to the internals on flexible flying leads with enough slack for the door to swing. Remote operator stations live in control switch enclosures. Field cabling enters through cable glands, which carry the strain relief and preserve the enclosure's IP rating — a gland rated below the box quietly downgrades the whole panel. Field devices that need disconnecting at maintenance connect through M12 circular or heavy duty connectors rather than hard wiring.
9. Marking, labelling and identification
For machine panels, identification is a compliance requirement under IEC 60204-1, not a cosmetic one: every conductor, terminal and component reference needs marking that survives commissioning and a decade of maintenance. Cable markers and terminal marker systems from the terminal block accessories range handle the conductors and rails; a label printer produces consistent component references on demand; and warning signs and labels cover the safety markings the finished installation requires.
10. Tools and consumables
Confirm the toolkit before the build, not during it: a ferrule crimper from crimping tools matched to your ferrule sizes, wire strippers and cutters, a screwdriver set with the right bits for the terminal range chosen — and a torque screwdriver where the manufacturer specifies terminal torques — plus a rail cutter and a multimeter for continuity and voltage testing. Heat shrink tubing and the adhesives and chemicals range round out the consumables.
Panel building essentials
Complete product checklist
Work through this table against your design before ordering — every row covered or consciously ruled out means no second order mid-build.
| Category |
What you need it for |
Rapid category |
| Enclosure |
Houses everything; sets IP and IK protection |
Wall mount / heavy duty enclosures |
| Enclosure accessories |
Mounting plates, hinges, locks, door stays |
Enclosure accessories |
| DIN rail |
Mounting backbone for rail-mounted devices |
DIN rails and accessories |
| DIN rail power supply |
Mains AC to 24V DC, with 20–30% headroom |
DIN rail PSUs |
| IEC mains inlet |
Panel mains power entry |
IEC mains inlets and outlets |
| Control devices |
PLCs, relays, contactors, timers per the design |
PLCs and HMIs / relays / motor control |
| Terminal blocks |
Serviceable field/panel wiring boundary, plus spares |
DIN rail terminal blocks |
| Terminal block accessories |
End brackets, jumpers, covers, markers — same brand as blocks |
Terminal block accessories |
| Fused terminal blocks |
Per-circuit overcurrent protection |
Fused terminal blocks |
| Distribution blocks |
Splitting PSU output to circuit feeds |
Distribution blocks |
| Hook-up wire |
Internal panel wiring, colour-coded to IEC 60446 |
Hook-up wire |
| Bootlace ferrules |
Every stranded conductor into screw/cage terminals |
Bootlace ferrules |
| Conduit and trunking |
Cable routing between rail rows and door |
Conduit and trunking |
| Cable glands |
Sealed, strain-relieved entry — rated to match the box |
Cable glands and bushes |
| Cable ties and clips |
Bundling and securing wiring runs |
Cable ties / cable clips |
| Grommets |
Protecting cables through sheet metal cut-outs |
Grommets |
| Door controls |
Operator interface: buttons, switches, e-stops |
Push buttons / selector switches |
| Panel indicators |
Status indication on the door or front plate |
Panel indicators |
| Field connectors |
Disconnectable field device connections |
Circular / heavy duty connectors |
| Cable markers |
Conductor and terminal identification (IEC 60204-1) |
Cable markers |
| Label printer |
On-demand terminal and component labels |
Label printers |
| Warning labels |
Safety and compliance markings |
Warning signs and labels |
| Heat shrink tubing |
Insulation and identification on flying leads |
Heat shrink tubing |
| Crimping tools |
Ferrule and terminal crimping |
Crimping tools |
| Wire strippers and cutters |
Wire preparation |
Pliers and cutters |
| Screwdriver set |
Terminal and component fixing; torque driver for spec'd terminals |
Screwdrivers |
| Multimeter |
Continuity, voltage and insulation testing |
Multimeters |
Ordering and despatch: high-volume lines across every category in this guide are ready to order, with same-day despatch on UK-stocked items and delivery within a week for extended-range stock. Contact Rapid to discuss specialist requirements.
Frequently asked questions
What size enclosure do I need for a control panel?
Size it from the DIN rail layout, not the other way round: total the rail length your devices need, then allow at least 30% additional internal space for trunking, heat and future expansion. Wall-mount steel enclosures suit most builds; floor-standing cabinets take over on larger designs. The enclosure modification service can deliver panels pre-cut for door components and glands.
How much DIN rail do I need?
Add up the width in millimetres of every rail-mounted device, then add at least 20% for end brackets and spacing. Rail sells in standard lengths and cuts to size on site, so round up — a paper layout of the components first turns the estimate into a measurement.
How do I manage heat inside a control panel?
Treat the panel as a shared thermal budget: every component dissipates into the same enclosed air, and device ratings assume an internal ambient the box itself determines. Size the PSU with 20–30% headroom, keep the 30% spare-space rule, separate hot components from temperature-sensitive ones, and budget for ventilation or heat management on dense builds or anything containing drives.
Do I need cable labels in a control panel?
For machine control panels, yes — conductor and terminal identification is required under IEC 60204-1, and it's what makes commissioning, fault-finding and maintenance possible without the original builder present. Cable markers handle the conductors; a label printer produces consistent terminal and component references on site.
Related guides and categories
Choosing the right electronic enclosure ·
Terminal blocks: how to choose ·
Enclosures ·
DIN rails and accessories ·
Power supplies ·
Automation and control


 {{SessionBasket.ItemCount }}
